This is a guest posting by Jim Holmes.
Automating User Interface testing (also called Functional Testing or End-to-End Testing) can be an extraordinarily difficult, frustrating exercise. Teams writing test automation at this level are hostage to so many different complexities including the UI technology stack, controls on the UI, delays in asynchronous actions, and many more.
Thankfully good teams can solve many problems with some good communication and collaboration between the developers and those writing the UI automation tests. This article will give you three specific tips for solving some common problems in UI test automation.
Two Fundamentals
Creating great locators is the most critical fundamental to learn in any UI automation work. Locators (also called find logic, object identifiers, and other labels) enable the automation tool to find a specific thing on the UI: a grid, a button, a text field. Without a stable locator, your script will outright fail or intermittently fail due as conditions change on the UI.
Handling asynchronous actions is the second critical UI automation fundamental to learn. Asynchronous actions happen when something on the page or view updates without blocking or freezing the entire UI. While this is terrific from the end user’s perspective it creates terrific headaches for test automation workers!
Custom Attributes
One easy step for solid locators is often overlooked by software teams: Build a great locator yourself! Good locators work off attributes or other metadata within the UI layer.
Every UI technology from HTML to native mobile applications give developers the ability to build up custom attributes. The details vary by technology, but every platform offers something similar to creating a hardwired attribute in HTML:
<span name="EditButton" >
In the example above we’re simply adding an attribute of “name” with a value of “EditButton” to a span element. This would give us the ability to create a good locator based on finding via that “name” attribute and value. To find and click that button one might use a snippet of WebDriver code like:
browser.FindElement(By.Name("EditButton")).Click();
The exact implementation of custom attributes will depend on your technology stack, but again, every UI stack provides something similar to the above concept.
for QA and Development Teams

Useful Dynamic IDs
When working in HTML-related UIs, test automation should prefer to use the “ID” attribute whenever possible. On valid HTML pages, each ID value should be unique on the page. Additionally, resolving or finding elements by the ID is often the fastest operation possible.
Unfortunately, some controls generate ID values that aren’t useful. They’re either position-based or they’re created with completely useless generated data.
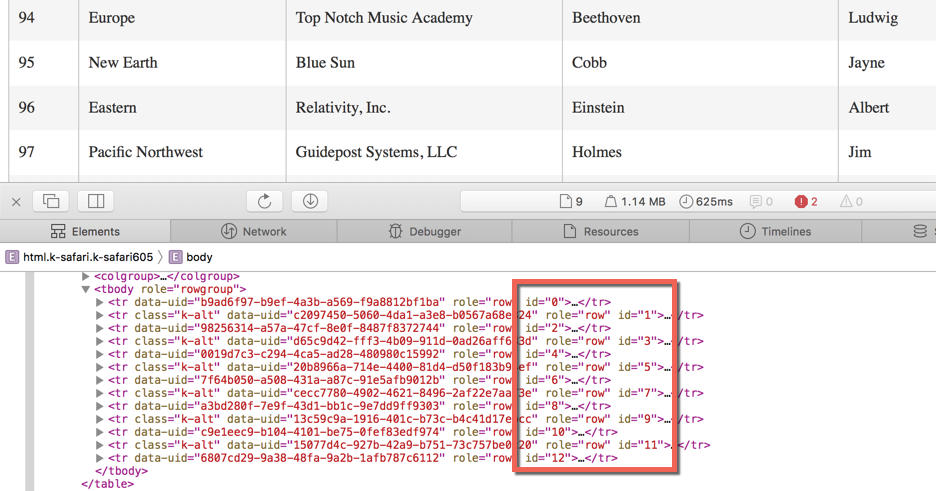
The image below shows a table created by Progress Telerik’s Kendo UI Grid, a Javascript component. You can see the ID values are based on the row’s position in the grid. This will cause a test to fail if the row you’re interested in position changes on the grid.
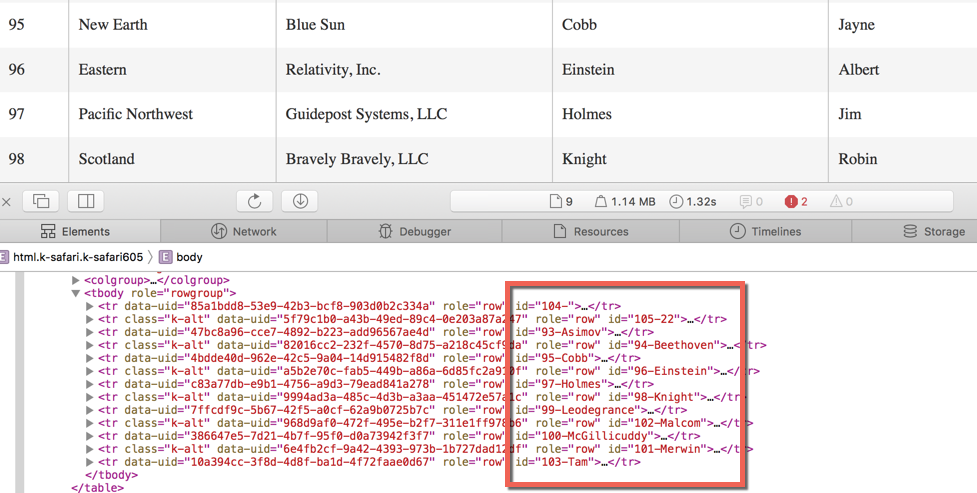
Thankfully most components allow teams to customize how attributes are created and displayed. Again, this varies by the UI stack and specifically with the component you’re using. A simple snippet of Javascript in Telerik’s Kendo Grid will update the ID value to be based on a combination of the last name and database ID value for that specific row.
dataBound: function(dataBoundEvent) {
    var gridWidget = dataBoundEvent.sender;
    var dataSource = gridWidget.dataSource;
    $.each(gridWidget.items(), function(index, item) {
        //use next three lines for html ID attrib
        // with custom ID of database ID + lname
        var uid = $(item).data("uid");
        var dataItem = dataSource.getByUid(uid);
        $(item).attr("id", dataItem.Id + "-" + dataItem.LName);
     });
Now we see useful ID values on the grid!
Note this is 100% specific to the particular application I pulled this example from. What’s important to take away from this is a custom attribute has been created based on data from the table record itself! This enables a flexible locator to be based on parts of that record. An example of this in WebDriver code might look like:
IWebElement row = browser.FindElement(By.CssSelector("tr[id$='Cobb']"));
This particular statement would find and return the table row where the ID value contains “Cobb”, thereby returning us the data for the user Jayne Cobb. We’re not linked to the row’s position in the table, which makes for a solid, flexible locator. (Hint: you can also generate robust, flexible locators using the free Ranorex Selocity extension for the Chrome DevTools).
Simplify Asynchronous Actions With Flags
As mentioned earlier, asynchronous actions update parts of the UI without blocking or freezing the entire screen. In our example above clicking a Create button pops up a new modal dialog on the web page. The user then fills out text fields, clicks “Update”, and sees the new record appear in the grid. The human user knows they that after clicking “Create” they must wait a moment until the popup appears. Unfortunately, a test script doesn’t automatically know about this and will likely fail as it tries to fill out the text before the modal actually exists.
Simple async situations like the above example can be resolved using the automation framework’s “wait” mechanisms. Exact implementation varies by tool, but the general idea is you wait for a specific thing to appear before you use it. Again, an example in WebDriver code:
     wait.Until(ExpectedConditions.ElementExists(
                     By.Name("Region")));
Often test automation scripters have to deal with far more complex scenarios which require chaining together multiple wait conditions. That makes tests more complex and far less understandable.
Developers working on a particular page, screen, or view should have a deep understanding of async operations happening on that page and/or complex calls from the page back to the server. It’s relatively easy for them to create a custom hidden element on the page that changes state as async actions are completed. This takes the burden off the test script creator and puts a far smaller, easier burden on the developer.
Staying with the same example from earlier, we might suppose that submitting a new contact on the grid might kick off a number of operations on the server. Moreover, several different things might happen on the UI which might by themselves not indicate the entire workflow was complete.
In this particular case, the Kendo UI grid can be tweaked to add a “flag” or “latch” element on the UI when the HTTP request to the server is complete. The latch element is further tweaked with a custom element “responseType” that contains the exact operation the server completed, eg “create”, “update”, or “delete”.
var contactSource = new kendo.data.DataSource({
        requestEnd: function (e) {
            var node = document.getElementById('flags');
            while (node.firstChild) {
                node.removeChild(node.firstChild);
            }
            //Next two lines add an empty DIV elem with response type
            //  as an attrib. This gives an easy asynch "latch"
            var type = e.type;
           $('#flags').append('<div responseType='' + type + ''/>');
        },
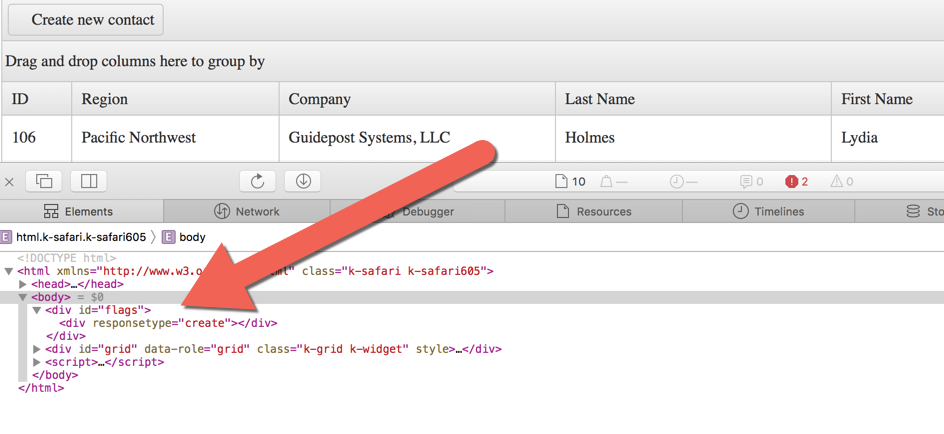
Now you can see a <flag> element on the grid after a new contact is created.
Again, this example is 100% specific to this exact example app, but the idea gives us the ability to easily create a wait latching on the new element when a create action is expected:
wait.Until(ExpectedConditions.ElementExists( By.CssSelector("#flags > div[responseType='create']")));
[NOTE: Please don’t use Thread.Sleep() or its equivalents. It’s an awful practice.]
Collaboration and Planning Ease Your UI Tests
UI test automation is fraught with all sorts of difficulties. These tips above will help you get past some of the most common problems and let you focus more on writing great, valuable, low-maintenance tests.
Jim is an Executive Consultant at Pillar Technology where he works with organizations trying to improve their software delivery process. He’s also the owner/principal of Guidepost Systems which lets him engage directly with struggling organizations. He has been in various corners of the IT world since joining the US Air Force in 1982. He’s spent time in LAN/WAN and server management roles in addition to many years helping teams and customers deliver great systems. Jim has worked with organizations ranging from start-ups to Fortune 10 companies to improve their delivery processes and ship better value to their customers. When not at work you might find Jim in the kitchen with a glass of wine, playing Xbox, hiking with his family, or banished to the garage while trying to practice his guitar.
Cross-Technology | Cross-Device | Cross-Platform


