This is a guest posting by Bob Reselman
Containers are all the rage, and understandably so. They provide all the benefits of a standalone virtual machine while making faster load times possible, as well as easier manageability for system admins and developers alike.
Yet containers do not guarantee optimal performance out of the box. In fact, it’s quite possible to deploy containers that run very slowly. The trick to avoiding such a hazard is to plan ahead and take precautionary measures.
Let’s look at three easy steps you can take to improve a container’s performance:
- Chain commands in a RUN clause of a Dockerfile
- Use a multi-stage build
- Preload the image cache
First, though, some background information.
A Container Is Not a Virtual Machine
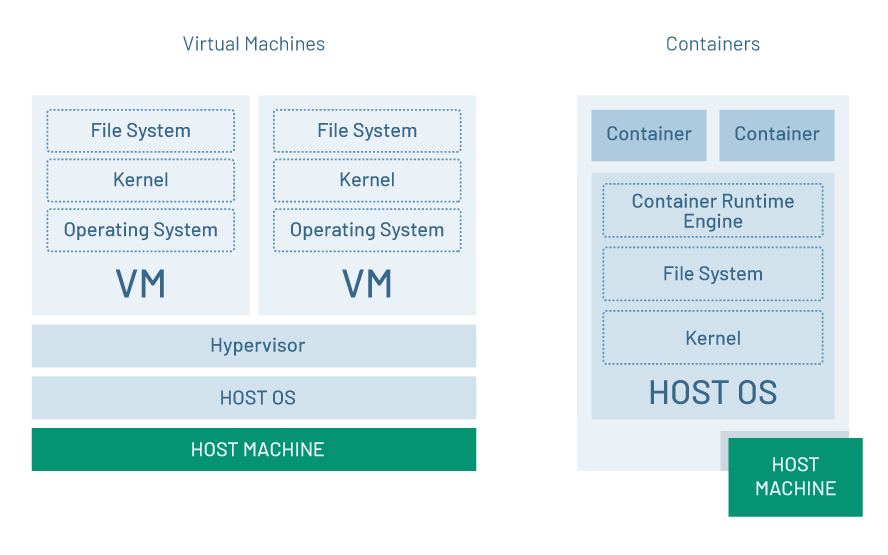
One of the most important things to understand when working with containers is that a container is not a virtual machine. Whereas a virtual machine runs as a software representation of a computer that is independent of the physical host machine, a container is dependent on the host machine’s operating system, kernel and file system. (See figure 1.)
Figure 1: A virtual machine’s kernel, file system, and operating system are independent of the host. Containers are not.
The real-world implication of the difference is that a virtual machine can run Windows, for example, and be hosted by a machine that is running Linux. On the other hand, a container running on a native Windows host machine must run Windows, and a container running on a Linux host must run Linux.
The short and the long of it is that a container runs on the host in what appears to be complete isolation from other containers. But, under the hood, all containers running on a given host are using that host’s kernel and file system. This intertwining with the host’s resources has ramifications, particularly around performance optimization.
Chain Commands in the RUN Section of a Dockerfile
A key element to improving container performance is to optimize the number and size of the layers that make up a Docker image upon which a running Docker container is realized. (A Docker layer is an element of a Docker image that is stored as a file on the host file system. For more information about the difference and relationship between Docker layers and a Docker container, go here.)
A Dockerfile is the text document that has the instructions the Docker build command uses to create a Docker image. Consider the following Dockerfile in listing 1, below.
FROM jenkins/jenkins
USER root
EXPOSE 8080

RUN curl --silent --location https://deb.nodesource.com/setup_10.x | bash -
RUN apt-get update
RUN apt-get install -y apt-utils
RUN apt-get install -y libltdl7
RUN apt-get install -y npm
RUN apt-get install -y dnsutils
RUN rm -rf /var/lib/apt/lists/*
Listing 1: A Dockerfile using multiple RUN commands to configure a Docker image
Notice that the Docker file has seven RUN commands. Each of these commands increases the size and load time of the Docker image that is the result of running docker build against the Dockerfile. Also, using multiple RUN commands in Dockerfile increases the time it takes to get the container that uses the image to load as a running instance, so performance is impeded.
An easy win to improve the intrinsic efficiency of a Dockerfile is to reduce the number of RUN commands in a Dockerfile.
Listing 2, below, shows the seven RUN commands in listing 1 reduced to a single one by using the && operator to chain the commands together. As a result, the size and number of layers associated with the Docker image is reduced.
FROM jenkins/jenkins
USER root
EXPOSE 8080

RUN curl --silent --location https://deb.nodesource.com/setup_10.x | bash -
 && apt-get update && apt-get install -y
 apt-utils
 libltdl7
 npm

dnsutils
 && rm -rf /var/lib/apt/lists/*
Listing 2: A Dockerfile using a single RUN command to configure a Docker image
Chaining commands is a powerful technique. Don’t underestimate the simplicity of using the && operator to reduce the number of RUN statements in a Dockerfile. Keeping an eye out for opportunities to chain commands together into a single RUN statement will improve the load time performance of a container, sometimes considerably.
for QA and Development Teams
Use a Multi-stage Build
As indicated above, each instruction (such as a RUN command) in a Dockerfile adds a layer to the overall size of a Docker image. The trick to getting a container to load quickly is to keep the size and number of layers down.
Another easy way to accomplish this is to use multi-stage builds. A multi-stage build allows you to use two or more FROM statements, which define the base layer of an image and give each set of instructions relevant to a given FROM statement a distinct name. Then, subsequent stages can reference the particular build stage by name.
Listing 3, below, shows an example of a multi-stage build.
#First stage
FROM golang:1.7.3 AS builder
WORKDIR /go/src/github.com/alexellis/href-counter/
RUN go get -d -v golang.org/x/net/html
COPY app.go .
RUN CGO_ENABLED=0 GOOS=linux go build -a -installsuffix cgo -o app .

#Second stage
FROM alpine:latest
RUN apk --no-cache add ca-certificates
WORKDIR /root/
COPY --from=builder /go/src/github.com/alexellis/href-counter/app .
CMD ["./app"]
Listing 3: Using multi-stage builds increases container load-time efficiency
With Docker, named stages are used and then discarded. As such, the size of the container image is reduced.
In Listing 3, the FROM clause in the #First stage defines a name, builder, to the stage. Then, in the #Second stage, the stage named builder is referenced in the final COPY command. The stage named builder is used and then discarded. Only the instructions in #Second stage are part of the Docker image’s layer.
Again, the fewer the layers in a Docker image, the faster the load time of the container that uses the image. Thus, better performance.
Preload the Image Cache
A final way to improve a Docker performance is to preload the image cache.
Docker has a very particular process by which containers are built. When you execute a docker run command, Docker will first look to see if any of the constituent layers that the container requires, as defined in the relevant image’s Dockerfile, are already downloaded to the host machine. If not, Docker will go to the internet to download the required layers from Docker Hub by default, or another Docker repository that will be defined in the Docker client configuration or in the Dockerfile directly.
If the layers are not already present on the host machine, the download time can be extensive, depending on the number, size, and location of the required layers.
Listing 4, below, uses the Linux command time to keep track of the time required to get a container up and running when none of the required layers are present on the host machine. Notice it takes a little more than four seconds to execute the docker run. That’s a considerable amount of time.
time docker run -d --name pinger -p 3000:3000 reselbob/pinger:v2.3
real 0m4.389s
user 0m0.036s
sys 0m0.024s
Listing 5: The time it takes to run a container when images are cached in advance on the host machine
Again, the first execution of docker run took over four seconds, but notice that the second execution, when the layers were preloaded, takes considerably less time. In fact, the second execution of the docker run, as shown in listing 5, was almost eight times faster!
Granted, it takes some time and significant planning to create and support a deployment process that preloads Docker layers onto host machines. However, given the dramatic performance improvements, it’s worth the effort.
Putting It All Together
Docker is a key technology in the modern enterprise. The flexibility and independence that containers provide allow companies to continuously revise and release software quickly to meet the demands of the marketplace.
However, there is more to using Docker technology effectively than posting Docker images in a repository and then firing up containers based on those images. Planning and best practices are required.
Hopefully, these three ways of improving container performance will help you get the most out of your efforts. Still need more? Check out this helpful post on containers and testing!


