The TestRail team is proud to announce the release of the TestRail CLI. By parsing and uploading JUnit-style test results into TestRail directly from the command line or by running the CLI as part of an automated build pipeline, you can focus on writing test code instead of needing to write, test, and maintain API calls in every test script.
Centralized tracking of testing progress, measuring quality and gaining historical intelligence across both manual and automated testing is now faster and easier than ever, bringing increased visibility and traceability to all stakeholders in testing.
You can find the more info about the TestRail CLI and installation instructions on GitHub, or continue reading to learn more.
Report automated test results faster
It’s important to track the status and results from your automated tests in the same tool as your manual testing to ensure full visibility across the team. But—before the TestRail CLI—if you wanted to report the results from your test automation, you would have to script a method to parse the results and upload them to TestRail with API calls written into your automation frameworks. Now, as long as you’re using a test automation framework that outputs a JUnit-style XML report or another report style that you can easily convert to a JUnit-style format, you can automatically upload those to TestRail with the TestRail CLI.
The TestRail CLI provides a programming language agnostic mechanism that converts one of the most common test result formats—JUnit-style XML files—into a set of TestRail test results, automatically create a new test run and upload the results to TestRail, and even generate new test cases in TestRail if you hadn’t copied them from your automation framework to TestRail yet. Here are some examples of the most popular test automation frameworks that can easily generate results files in JUnit-style XML files:
- JUnit
- Cypress.io
- Playwright
- Robot Framework
- Pytest
- NUnit
Besides making it easier to integrate TestRail with your test automation stack and bring visibility to the automated tests you’re running during test cycles, the TestRail CLI also cuts down maintenance overhead and speeds up the process of scripting new test automation so that you can increase test coverage without losing oversight. The CLI tool also opens up new opportunities for tracking and comparing historical results for ad hoc exploratory testing as well as security, load, and performance testing, provided that the automation tools you are using to execute these types of tests can generate JUnit style reports.
Read on to learn how to:
✔ Install the TestRail CLI Tool
✔ Configure your TestRail instance for use with the TestRail CLI (enabling the TestRail API and adding custom case field called ‘automation_id’)
✔ Run the CLI tool and upload test automation results
✔ See your test results on TestRail
Installing the CLI Tool
Users can use the TestRail CLI within CI/CD pipelines in popular tools like Jenkins, GitLab CI, GitHub Actions, Azure DevOps Pipelines, TravisCI, etc. Simply add another step to the build pipeline script once an automated test job is completed to push the results of your tests directly into TestRail.
You can also install and leverage the CLI from your local machine if you are running unit or other automated test suites manually as well.
To install the CLI tool, you just need to have Python 3 installed as well as pip3 and run the following command:
$ pip3 install trcliConfiguring your TestRail instance
Before using the CLI tool, you first need to configure your TestRail instance as follows:
- Enable the TestRail API by accessing the Administration panel, going to Site Settings, click on the API tab, and checking the Enable API option. You can refer to the API Introduction page for more information.

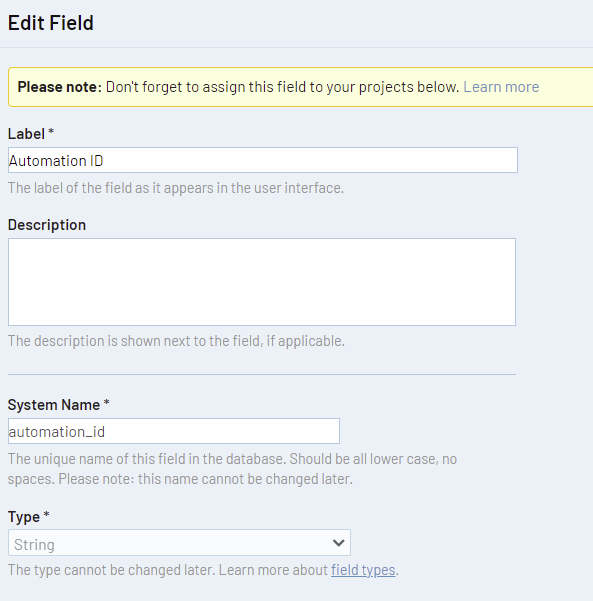
- Create a custom field in order to map your automated test cases code to the actual TestRail cases. You can do so by accessing the Administration panel, going to Customizations on the right side and clicking Add Field. After you’ve reached the field creation screen, as per the image below, there are two requirements for this custom field:
- The System Name must be automation_id
- The Type must be String.
If you are still not sure about how to set up a custom field, please refer to our documentation on Configuring custom fields.

Importing your JUnit-style test results to TestRail
The CLI tool is designed to be simple and efficient. Once it has been installed and your TestRail instance is properly configured, a JUnit results file can be passed through the command line to quickly create a run and add testing results.
By way of an example, we set up an example TestRail project to accept incoming API requests, and pushed the sample report below to our TestRail instance via command line. Notice the -y option on the command itself, which skips the prompts to automatically create new tests. This is useful when running the CLI tool through your CI tools.
Note: It is recommended that you create an API key under My Settings on your account and use it instead of your password. This will prevent you from exposing your password and thereby creating a security risk.
You can see an example of the test results file we got from our automation project in a JUnit-style XML file below.
<testsuites name="test suites root">
  <testsuite failures="0" errors="0" skipped="1" tests="1" time="0.05" name="tests.LoginTests">
    <properties>
      <property name="setting1" value="True"/>
    </properties>
    <testcase classname="tests.LoginTests" name="test_case_1" time="159">
       <skipped type="pytest.skip" message="Please skip">
         skipped by user
       </skipped>
   </testcase>
   <testcase classname="tests.LoginTests" name="test_case_2" time="650">
   </testcase>
   <testcase classname="tests.LoginTests" name="test_case_3" time="159">
     <failure type="pytest.failure" message="Fail due to...">
       failed due to…
     </failure>
   </testcase>
 </testsuite>
</testsuites>
Once we have the results from an automation run in our XML file, we can upload them to TestRail using the following command.
$ trcli -y
>    -h https://trcli.testrail.io
>    --project "TRCLI Test 1"
>    --username [email protected]
>    --password TestRail123!
>    parse_junit
>    --title "Automated Tests Run"
>    -f results.xml

Checking project. Done.
Adding missing sections to the suite.
Found test cases not matching any TestRail case (count: 3)
Adding missing test cases to the suite.
Adding test cases: 3/3, Done.
Creating test run. Done.
Adding results: 3/3, Done.
Submitted 3 test results in 6.5 secs.
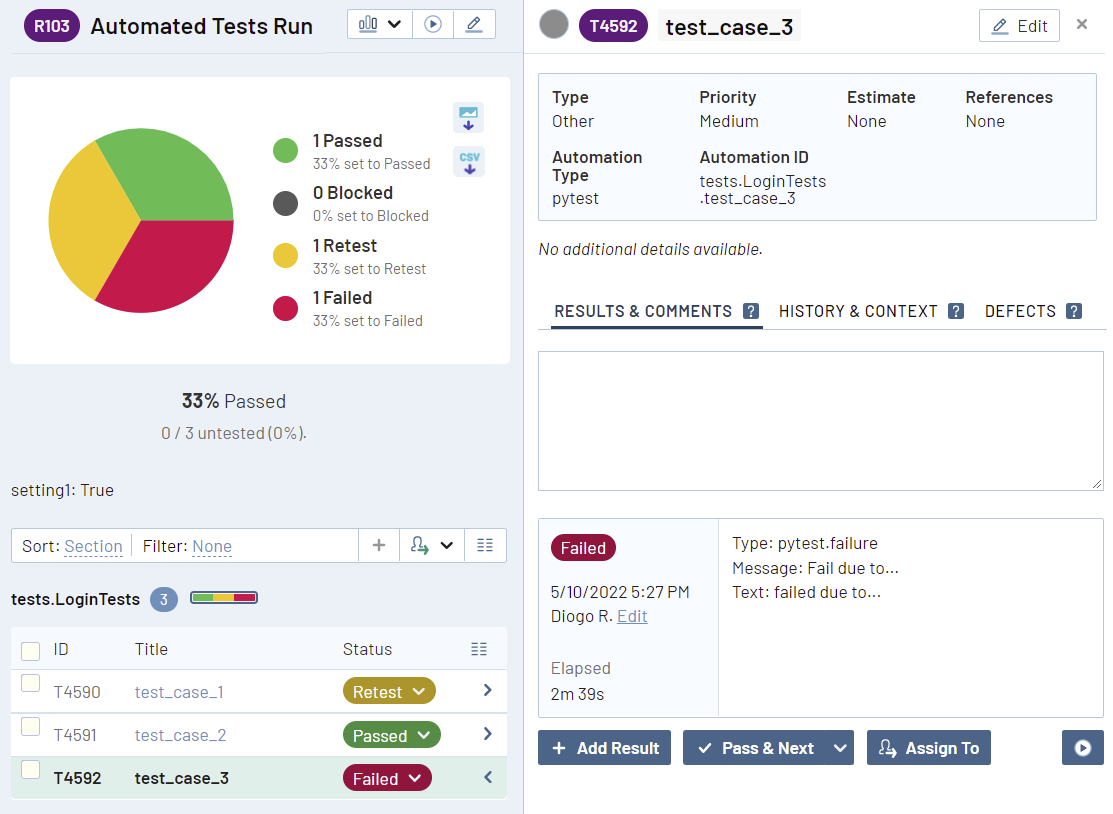
Once the import process is complete, you can see we have a new run titled Automated Tests Run within the TRCLI Test 1 project (based on the settings you submitted via the TestRail CLI command):

By opening the test run, you can see the results for each test case. You can then drill further into a failed test case and check the error message that was imported directly from the JUnit report. This can be helpful to have a quick overview of what went wrong during the test.

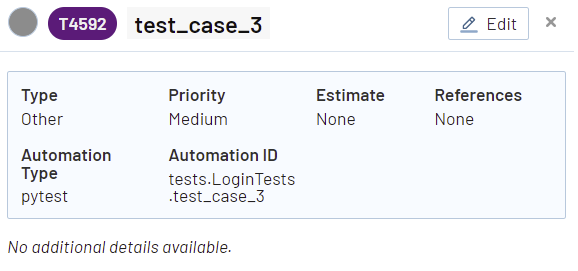
Notice that the test cases on this test run did not previously exist on TestRail. These test cases were created by the CLI tool, which uses the pattern classname.name (attributes from the JUnit report) to fill in the Automation ID field so that it can import the results to the correct case on TestRail on future test runs, assuming the test name and classname don’t change. On the image below, you can see that test_case_3 has the Automation ID value filled in with the value tests.LoginTests.test_case_3, as expected, so that the CLI tool will be able to identify it in future test result imports.

Other useful features
Using config files to store alternate configurations
Quickly and easily submit results to different instances or projects, use different credentials, or other preset parameters in your commands by using an alternate config file. The configuration file will be written in YAML format, named config.yml, and stored in the same directory as the TRCLI executable file, unless otherwise specified. Environment variables can also be used. If a configuration file is referenced in the command, all parameters within the configuration file will override the environment variables. Any parameters specified in the command will override the config file.
The following example displays the use of an alternate configuration file that stores users credentials:
host: https://trcli.testrail.io
project: TRCLI Test 1
username [email protected]
password TestRail123!
project: TRCLI Test 1
title: Automated Tests Run
$ trcli -y
> --config alternate_config.yaml
> parse_junit
> -f results.xmlUpdating test results
Imagine you already ran the CLI tool and you have your automated test results on TestRail, but some of the tests failed and you want to rerun those and update the existing test run with the new results. In order to do so, you just need to pass the –run-id argument and the CLI tool will update the test run with that id.
$ trcli -y
>    -h https://trcli.testrail.io
>    --project "TRCLI Test 1"
>    --username [email protected]
>    --password TestRail123!
>    parse_junit
>    --title "Automated Tests Run"
>    --run-id 32
>    -f results.xml

Checking project. Done.
Adding results: 3/3, Done.
Closing test run. Done.
Submitted 2 test results in 2.5 secs.
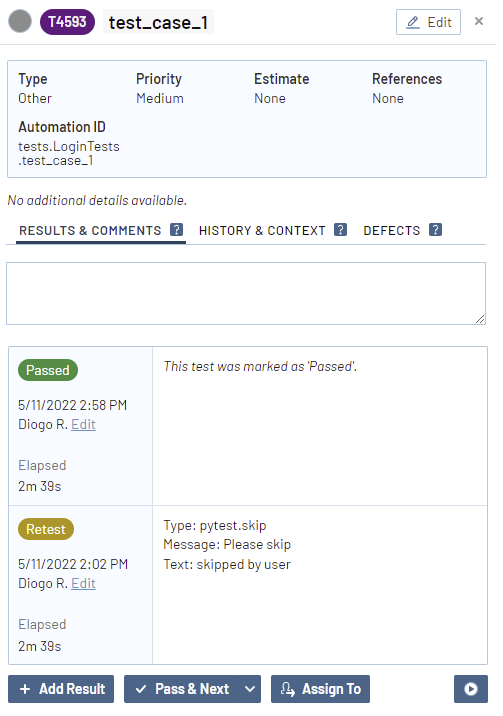
You should now see the new test result on the test details panel. This is one way to keep track of your automated test results under the same test run.

Closing the test run
If you want to immediately close your newly created test run, you can simply pass the –close-run argument and the CLI tool will perform that action after all the results have been added. This is useful if you don’t want to allow changes to be made to the results after the run has finished.
$ trcli -y
>    -h https://trcli.testrail.io
>    --project "TRCLI Test 1"
>    --username [email protected]
>    --password TestRail123!
>    parse_junit
>    --title "Automated Tests Run"
>    --close-run true
>    -f results.xml

Checking project. Done.
Creating test run. Done.
Adding results: 3/3, Done.
Closing test run. Done.
Submitted 3 test results in 3.2 secs.
You can find your test run under the Completed test runs section.

Added benefits
Multithreading
The CLI tool was made to quickly upload test results through a series of API calls, which are inherently impacted by network latency. To optimize the performance, multiple threads are used to execute a series of API calls at once.
Retries & throttling
While multithreading allows the CLI tool to make calls to the TestRail API more efficiently, it can also be troublesome if it hits API rate limits. To circumvent this, retry and throttling mechanisms were put in place. If the rate limit is hit, the CLI Tool will wait the appropriate amount of time and retry the call for a successful response.
Unit tested
To make it easier for contributors to make changes to the open source TestRail CLI project with confidence, we included a vast number of unit tests to avoid unwanted side effects.
Extensible
Need a parser for a different type of report? Simply fork the project on GitHub or submit a pull request and create a new parser class, implement it according to the CLI tool data model, and you can trust the remaining pieces of the code to upload your test results! You can also implement new functionalities without having to fiddle with existing code.
Open Source
Want to see some additional functionality or a new feature in the TestRail CLI? Feel free to submit an issue on the GitHub project or make the updates yourself and create a pull request to have your changes reviewed and merged into the source code.


